

When comparing a student instrument kit, match the exact faculty description and reference rather than buying by the outline of an instrument. Learn the name, the distinguishing catalogue details and the questions that remain. Recognising an instrument is educational identification; it is not instruction or permission to use it clinically.
This guide introduces common vocabulary so you can read an itemised quotation. It is not a required kit for Ajman University, Gulf Medical University or another institution. Faculty specifies what you need, in which pattern and quantity, and teaches handling and use under its protocols.
Read the three parts of a description
A useful catalogue entry normally gives a name, a pattern or specification, and a manufacturer reference. The name identifies the family; the pattern distinguishes versions within it; the reference lets the supplier identify the particular item. “Probe” alone is a family-level description, not a complete order.
The 2025 HuFriedyGroup catalogue lists probes, explorers, mirror handles and mirror heads as separate diagnostic sections. That is why those names should not be collapsed into “examination tool”, and why a mirror head can be priced without a handle. Check the current entry for the item you are considering. A manufacturer catalogue is a terminology reference, not a university requirement.
Keep the supplier’s description beside the faculty wording. If they use different names, ask for an explicit match with a reference. Do not assume that a local nickname, an English name and a translated label always describe the same pattern.
Original identification schematic
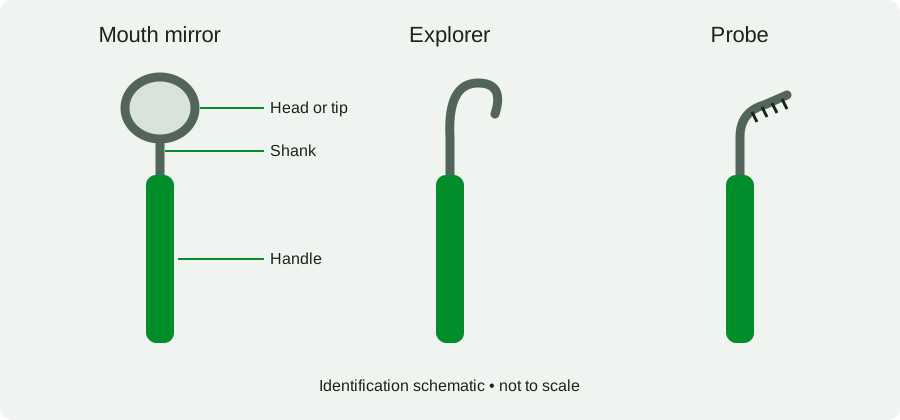
Use the drawing to locate the head or tip, shank and handle in a product photograph. Do not use it to judge sharpness, condition, clinical suitability or a probing scale. The exact shape and marking system must come from the manufacturer entry and your faculty’s specification.
Instrument identification table
The following examples are illustrative and subject to faculty confirmation. They are not a shopping list. The checks focus on catalogue descriptions, not technique.
| Catalogue family | Visual or written cue to investigate | What to confirm before buying |
|---|---|---|
| Mouth mirror | Mirror head attached to a handle; head may be sold separately | Head size/type, handle inclusion and specified connection |
| Explorer | Fine working tip, often curved; single- or double-ended descriptions | Exact pattern/reference; do not substitute a probe by name alone |
| Periodontal probe | Tip with a named marking system | Marking pattern, reference and required version |
| College tweezers / cotton pliers | Paired jaws rather than a single working tip | Tip pattern, locking/non-locking version if specified, and reference |
| Excavator | Catalogue identifies an excavator pattern and working-end size | Exact pattern, size, single/double-ended version |
| Carver | Named carver pattern rather than a universal blade shape | Pattern and dimensions on the faculty list |
| Spatula | Blade form and dimensions vary with the listed purpose | Specified type, dimensions and material |
| Scaler / curette | Distinct families and named patterns; a photo alone is insufficient | Exact faculty-specified family and pattern; no visual substitution |
For families beyond diagnostic instruments, consult the current manufacturer’s full entry rather than inferring function from the table. The same HuFriedyGroup catalogue groups other instrument families in their own sections. This guide neither endorses a brand nor claims that any listed family is required in your course.
Numbers, markings and sizes need context
A number printed beside an instrument can identify a pattern rather than a length. Another number may identify a manufacturer’s ordering reference, a size or a pack quantity. Record the whole description and ask which number is which. A cropped screenshot that shows only “5” loses the context needed for an order.
For marked instruments, request the name of the marking pattern and the manufacturer reference. Do not assume that two visibly marked tips have the same scale. Your faculty teaches measurement with the specified instrument.
For two-ended instruments, check both ends. A kit list may name one family while the offered product combines different ends. Ask whether the combination is accepted before replacing a faculty-specified item with a seemingly convenient alternative.
Compare a kit without counting unlike items as equal
Request an itemised list with reference, description and quantity for every component. A “ten-piece kit” could count heads and handles separately or contain ten unlike instruments. The number of pieces says little about whether the kit covers your requirements.
Map each confirmed faculty entry to one offered reference. Mark “unmatched” rather than guessing where the description is vague. Then check whether accessories, handles or storage items are included or separate. Keep optional additions outside the required subtotal so the price comparison remains clear.
An illustrative quote-review record might contain: faculty entry ______; offered reference ______; pattern match confirmed by ______; quantity ______; included accessories ______; unresolved question ______. The entries in each field come from your course list.
Ask for evidence when descriptions conflict
If a seller calls an item “explorer/probe,” ask whether that means a combined instrument, an uncertain description or two alternatives. Request the full manufacturer entry and compare it with the faculty list. Do not resolve the uncertainty by assuming all pointed instruments have the same role.
If an image and written description disagree, ask the seller which reference will actually be supplied and request a corrected quote. A reference image may be illustrative. Preserve the written clarification so the received label can be checked against what you approved.
For an instrument already owned, record its visible reference and ask faculty to review its acceptability. Do not test a tip on a person or attempt to reshape, sharpen or repair it to make it resemble a catalogue illustration. Condition and maintenance questions belong with the appropriate instructor and manufacturer instructions.
Receive, record and then follow teaching protocols
At receipt, compare labels, references and quantities with the order before separating the items from their packaging. Keep receipts and flag discrepancies. Ask faculty how identification and storage should be handled in your setting before marking the instrument or choosing a processing container.
Follow manufacturer instructions and faculty protocols for handling and infection control. Purchasing familiarity is not clinical competence. Where a description remains unclear, the correct next action is a specification question, not an improvised clinical use.
Use the Students shopping section only after confirming the current list. Continue with the budget guide to avoid buying an accepted item twice, or the independent Ajman University and Gulf Medical University guides for different preparation tasks.